Requirements
🎯 Do you have Carrier-Calculated Shipping (CCS) enabled in your Shopify store?
Please select below to see relevant instructions for your setup:
Required step: choose one option to continue.
How to quickly check in Shopify admin:
- Go to Settings.
- Open Shipping and delivery.
- Scroll to the Carrier accounts section.
- If Third-party carrier rates are active there, choose Yes. If not, choose No.
Path: Settings → Shipping and delivery → Carrier accounts
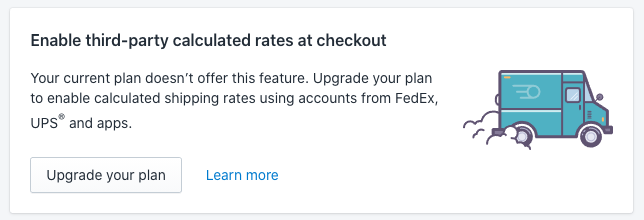
⚠️ If you see a view like this — you do not have CCS. Choose No.
All instructions below will appear after you choose Yes or No.
Shopify Carrier-Calculated Shipping
Shopify Carrier-Calculated Shipping
Third-Party Carrier-Calculated Shipping (CCS) is optional for using the Unisend integration. However, we highly recommend enabling CCS to unlock advanced features and improve the checkout experience for your customers.
Why use CCS?
By enabling CCS, you unlock valuable features that enhance the shipping experience:
- Display parcel lockers at checkout based on the customer’s address
- Show real-time shipping prices based on your Unisend contract
- Easily manage and control shipping rates directly from the Unisend app
How to enable a third-party shipping in Shopify?
Firstly, it's crucial to note that enabling CCS requires a Shopify plan that supports this feature. If you're on the Basic plan, enabling CCS is not possible. Ensure you're on a plan that allows CCS before attempting to enable it in your Shopify settings.
There are two options available to add Third-party carrier-calculated shipping rates to your Shopify plan:
Option 1: activate feature for extra fee
The feature can be added to your monthly subscription on the Shopify Grow plan for an additional $20 USD per month.
Option 2: switch to Shopify Grow annual plan
If you switch your billing cycle from monthly to annual, the subscription cost will be discounted by 10%, and the feature will be included to your annual Shopify plan for free.
For more information about enabling Third-party carrier-calculated rates (CCS) and for assistance with the process, please reach out to Shopify Support.
Using Unisend on the Shopify Basic plan
If you’re on the Shopify Basic plan and choose not to enable CCS, you can still use the Unisend app with limited functionality:
- Parcel locker selection is not available at checkout.
Customers will only be able to choose a parcel locker on the Thank You page after placing the order. - Real-time shipping prices based on your Unisend contract are not supported.
Instead, only fixed-rate shipping prices can be shown at checkout.
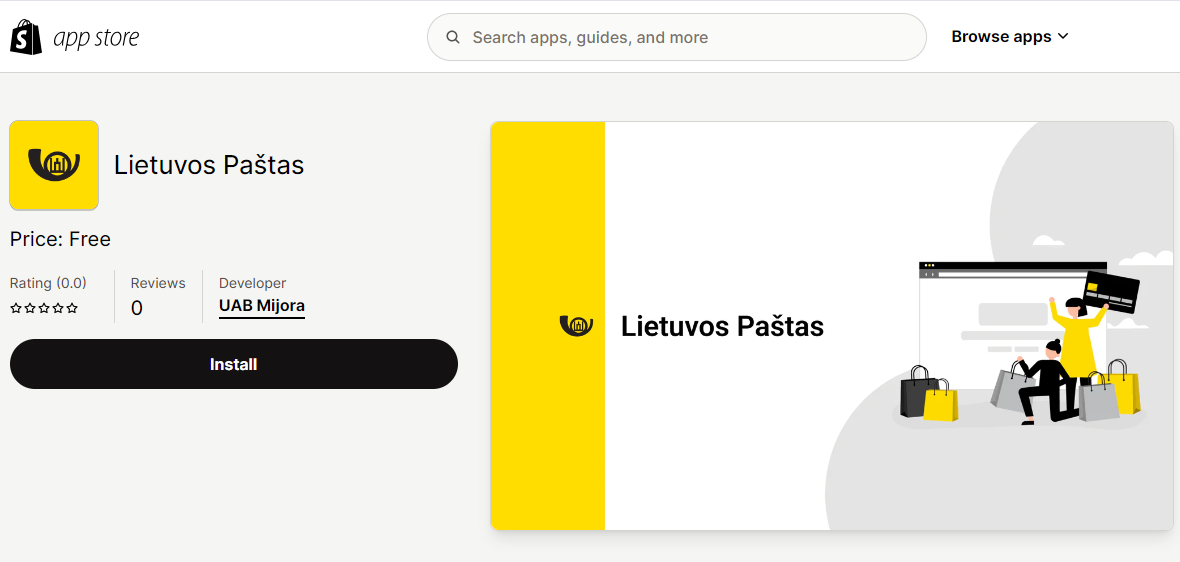
Installation
To install the Unisend app on your Shopify store, simply click on the following direct link: https://apps.shopify.com/lietuvos-pastas
Once on the installation page:
- Click on the "Install" button.
- Shopify may prompt you to confirm the installation.
- Review the permissions requested by the Unisend app and click "Install app" to proceed.
- Authorize the app with your Unisend / LP Express self-service credentials.
- Start using the Unisend app on your Shopify store.
Shopify Basic installation
Shopify Basic plan doesn’t support showing parcel locker selection during checkout without Carrier Calculated Shipping (CCS).
As a workaround, we display the parcel locker dropdown after the order is placed, on the Thank You page — this is allowed even without CCS.
Below are the steps to enable this:
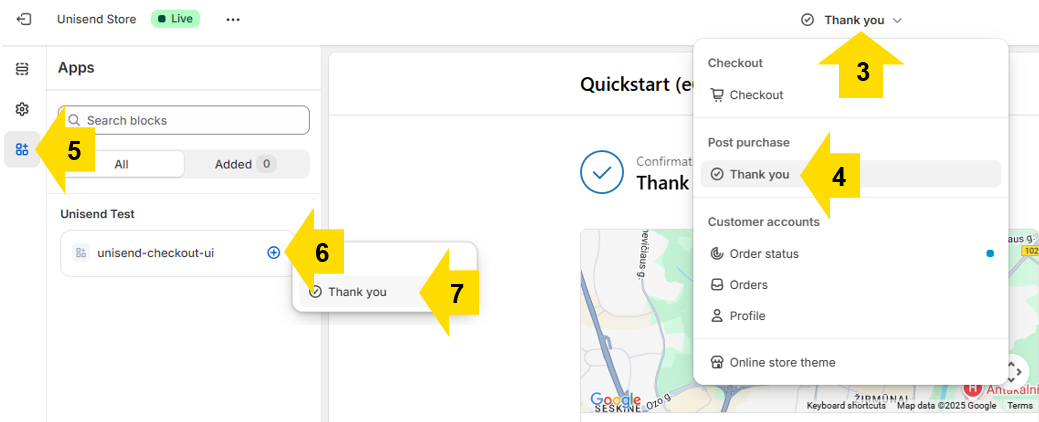
- Open Checkout Settings. In your Shopify admin, go to Settings → Checkout.
- Still under Checkout settings, find the Configurations section and click Customize.
- Switch to the "Thank You" Page.
- On the left sidebar open App Blocks.
- Find the app named Unisend, and click the + (plus) button next to it.
- Select the “Thank You” Block. When prompted, choose Thank you to add the app block to this page.
- The block will appear in the page preview. Drag it to your desired position — ideally above the "Order details" block for better visibility.
- Click Save in the top-right corner. Once saved, click Exit to finish.

Once enabled, the parcel locker selection will appear on the Thank You page like this:
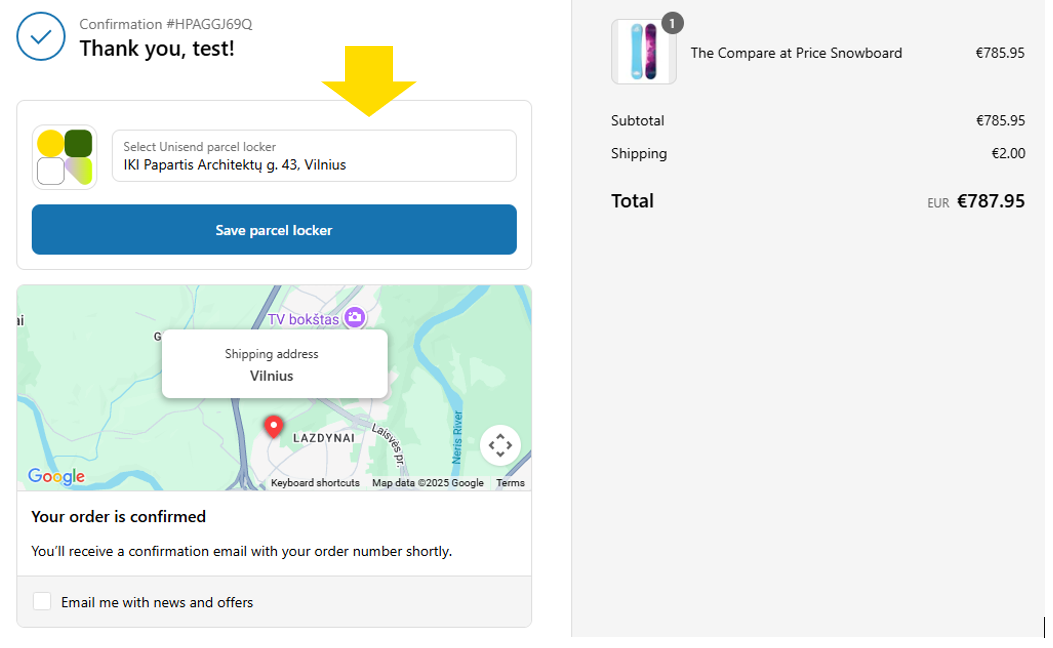
Customers will be able to choose their preferred parcel locker and click “Save parcel locker” after the order is confirmed. If the customer does not select a parcel locker manually, the system will automatically assign the nearest locker based on the shipping address provided at checkout.
Main app settings
Authorization
To proceed with the app setup, you need to complete the authorization process.
Attention: Authorization is only available for Unisend clients with a service contract and enabled API access.
You can enable API access and obtain authorization credentials within your Unisend self-service account.
Use the provided credentials to authenticate the plugin.
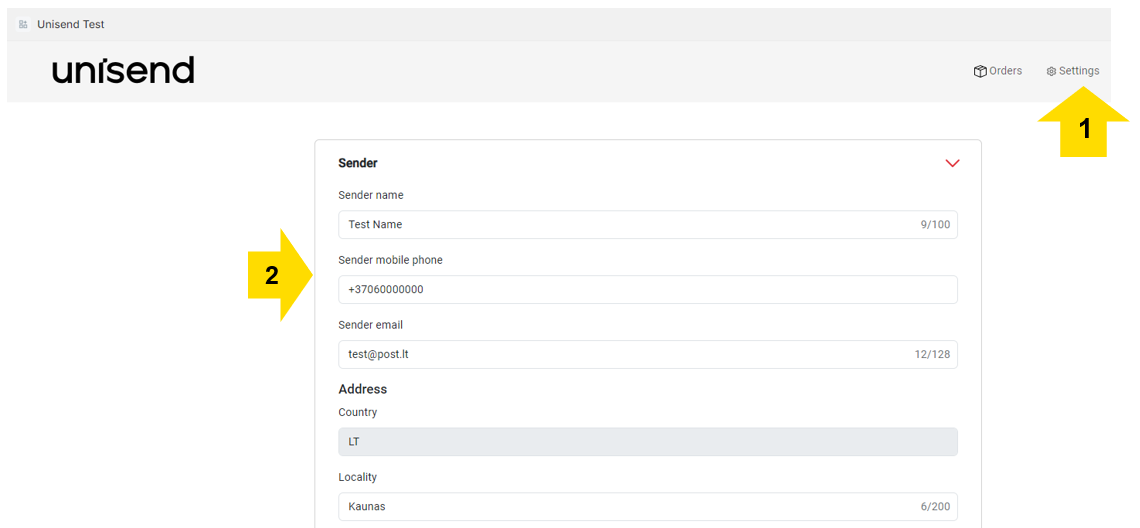
Sender information
In the sender's information section, at Settings page (1) it is required to enter the sender's name, e-mail address, phone number and address. The information specified in this section (2) will be visible in the printed documents.
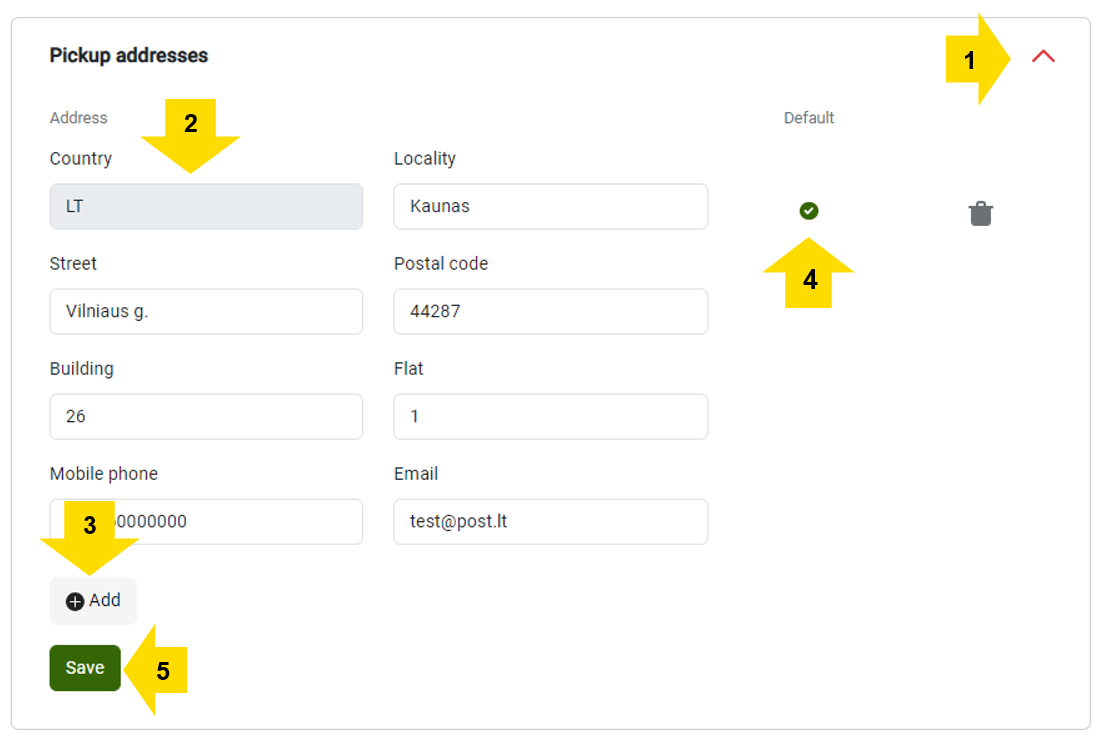
Pickup information
Expand the pickup address section (1) and provide the pick-up address details (2) if you need a courier pick-up.
You can enter multiple pick-up addresses (3) if you have different pick-up locations and set one as the default address (4).
The information provided in this section will be used as the main address where the courier will come to pick up the prepared packages.
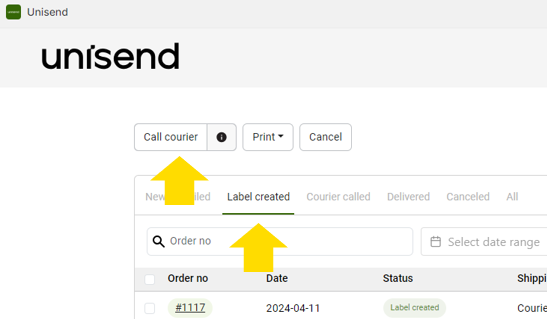
Call courier
Manual courier call
To use the manual or automatic courier call feature at a scheduled time, coordination with Unisend is necessary for service activation. If you don't find the courier call button in the "Label created" section, it indicates that the manual courier call service isn't enabled for you, and the courier will be called automatically after each shipment is created.
In the "Label created" section of the shipments you've created, choose the ones for which you want to call the courier, then click on the "Call courier" button.
Automated courier call scheduling
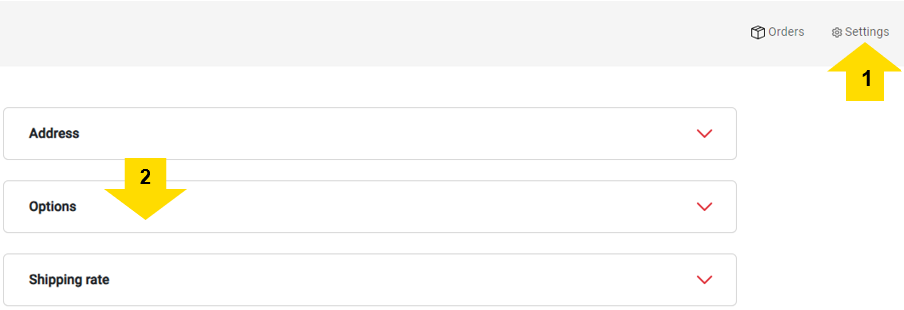
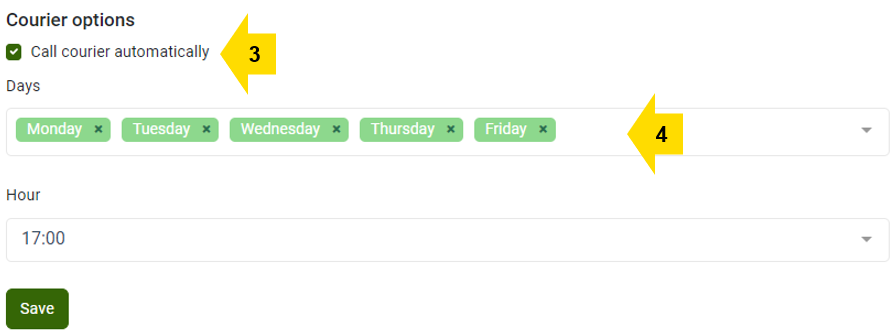
On the settings page (1), expand the "Options" section (2), turn on "Call courier automatically" function and select the days on which you wish to schedule a courier call at the chosen time.
Other settings
Default dimensions
If you want to automatically determine the size of the shipment based on the products in the received order, please enter the default product dimensions and weight (if weight is not entered in the products details). The size of the shipment will be determined based on these dimensions.
Please note that the sizes of the products most commonly used in your store must be entered, not the sizes of the parcel locker box.
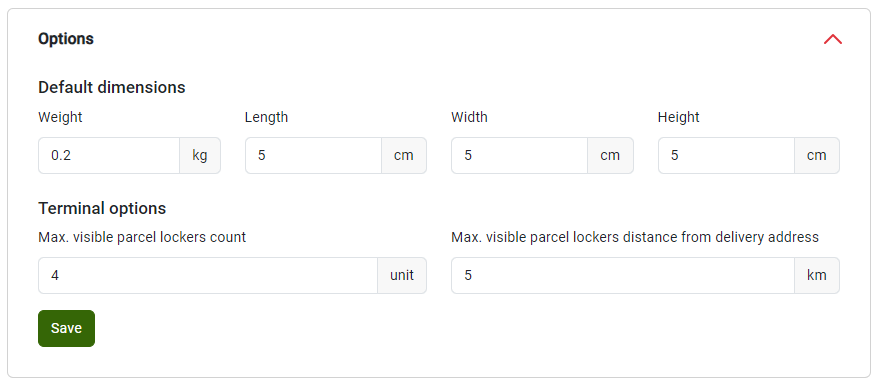
In this section, you can also configure how the terminals will be displayed on the Checkout page. For instance, you can choose to show 4 parcel lockers located within 5 km of the customer's entered address on the Checkout page. This feature is available only for users with CCS enabled.
Returns
When creating shipping methods, you can enable return label generation.
By activating the “Order return label” setting, it will be applied to all shipments of that specific shipping type. This means that whenever a shipping label is generated, a return label will be created automatically as well.
The generated return labels can then be provided to your customers either together with the shipment or separately, depending on your business process.

If you do not want to create return labels for all orders, you can control this for each order separately. Also, if automatic return labels are enabled, but you want to skip it for a specific order, you can turn it off.
To do this, open the order edit page and use the “Return label” checkbox to turn the return label on or off for that order.
Important: This setting must be selected before creating the shipment. Once the shipment is created, the return label option cannot be changed.


Shipping methods
If you are on Shopify Basic and do not have CCS, either upgrade your plan and enable CCS, or follow the guide for Basic plan users (click here).
Unisend shipping settings
In the Unisend settings section, you can create the shipping methods you need. Expand the "Configure carrier" section and create shipping method from the provided options.
In this example, we will show how to create a shipping method specifically for sending parcels between parcel lockers.
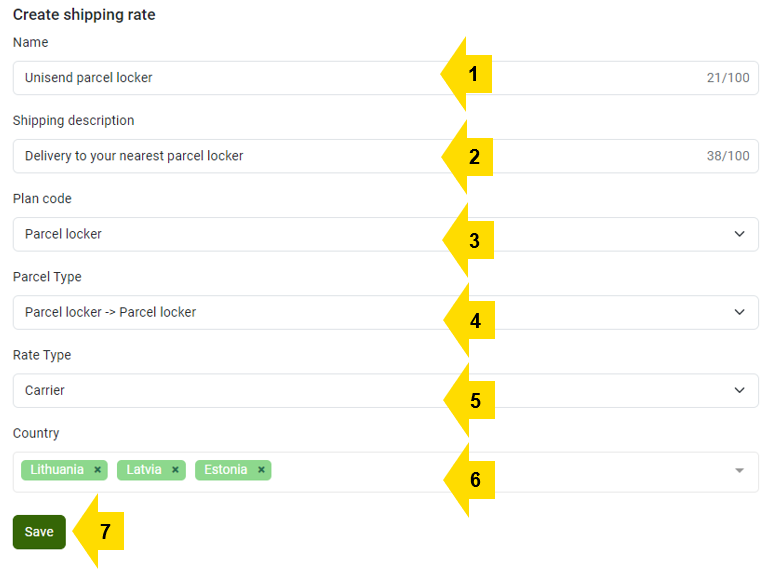
1. Enter the shipping method name that will appear in the Checkout page. It can be entered in free form, for example: "Unisend parcel locker"
2. If you wish to provide a description for the shipping method, please input it into the "Shipping Description" field. This information will appear on the checkout page below the primary shipping method name.

3. Select "Plan code"; this is the primary parameter that determines the shipping method you will use. We are sending to a Parcel locker.
4. Choose the method of picking up the package. In this case, select "Parcel locker -> Parcel locker" because we are sending the package by placing it in the Parcel locker.
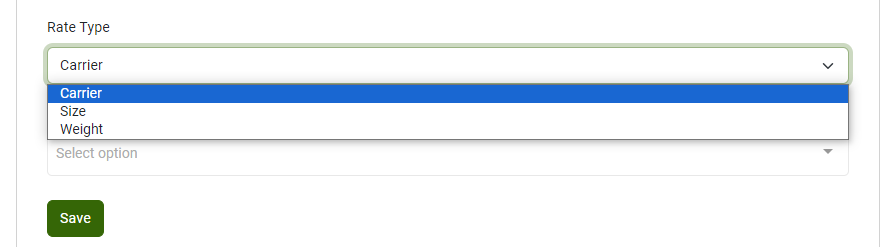
5. Select a shipping cost method. If you select "Carrier," the shipping price in the Checkout page will be automatically offered to the buyer according to the rates applied in your contract.
6. Select one or several countries to which you plan to send packages. In this case, parcel lockers are available in all Baltic countries.
7. After completing steps 1-7 as mentioned above, proceed to add any additional required shipping methods.
Shipping rates
Carrier
If you select "Carrier," the shipping price in the Checkout page will be automatically offered to the buyer according to the rates applied in your contract.
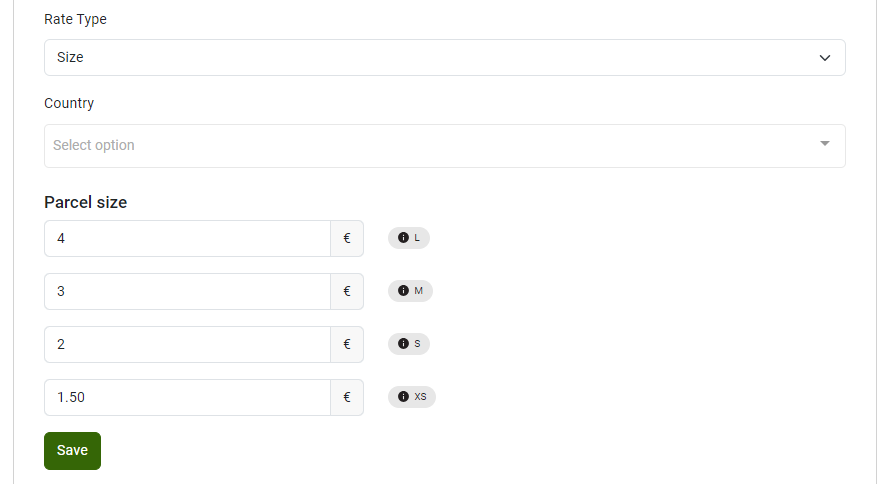
Size
You can manually specify prices based on the size of the shipments if you wish to apply rates different from specified in your contract.
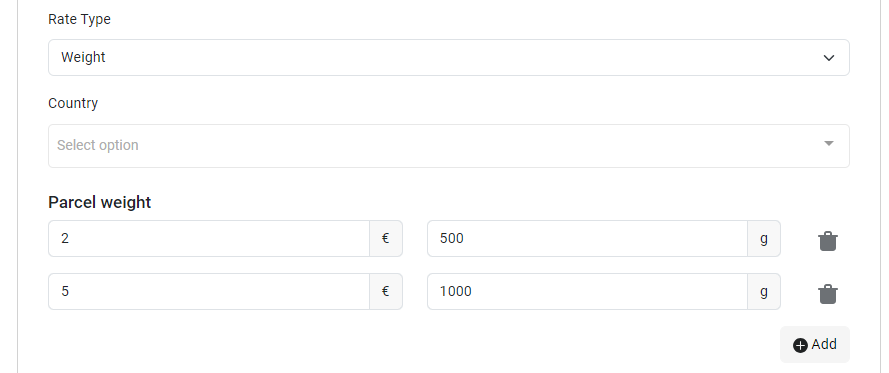
Weight
To implement a variable shipping price based on the weight of the shipment, choose "Rate Type" > "Weight".
Enter the price in the left column and the weight, up to which the price will apply, in the right column. In our example, we apply a shipping price of 2 euros for packages weighing less than 500g and a price of 5 euros for packages weighing between 500 and 1000g.
Shopify Basic shipping settings
If you are using the Shopify Grow plan or higher with CCS enabled, please follow the guide for CCS users (click here).
We recommend upgrading to a higher plan if you want to offer more flexible and dynamic shipping options — including parcel locker selection at checkout.
In this example, we will show how to create a shipping method specifically for sending parcels between parcel lockers.
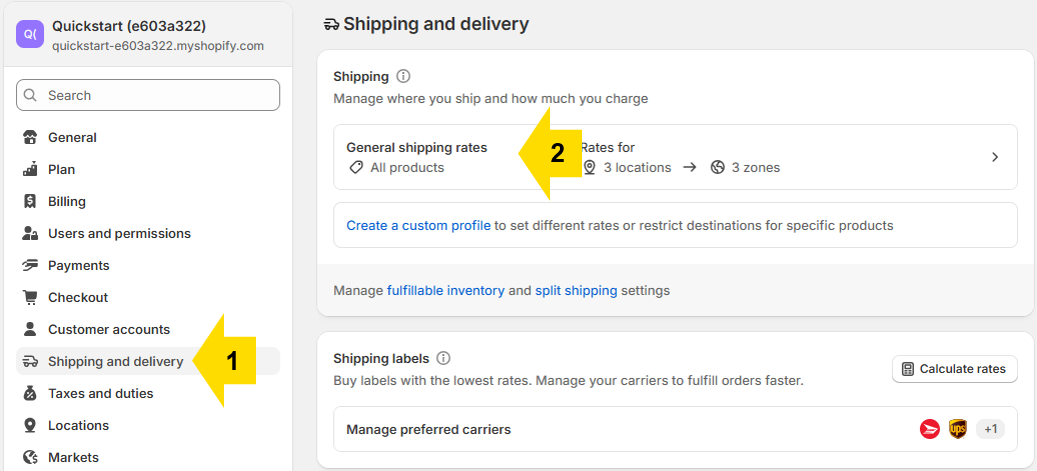
- Go to Settings → Shipping and delivery.
- Click General shipping rates under Shipping.
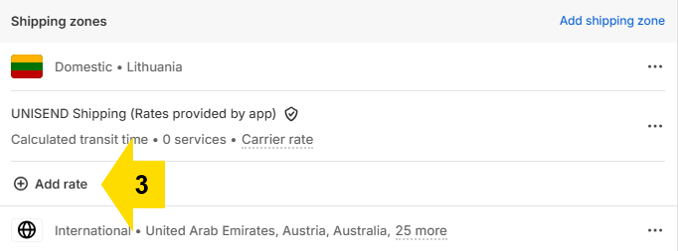
- Under your zone (e.g. Lithuania), click Add rate.
- Set:
- Rate type: Use flat rate
- Name: e.g. Unisend Parcel Locker
- Price: e.g. €2.50
- Click Done.
- In the Unisend app settings under Shopify Shipping Rate, find the newly created method (e.g. Unisend Parcel Locker).
- Enable it, then set:
- Plan code: Parcel locker
- Parcel type: Parcel locker → Parcel locker
- Click Save.


Printing labels and manifests
Bulk labels printing
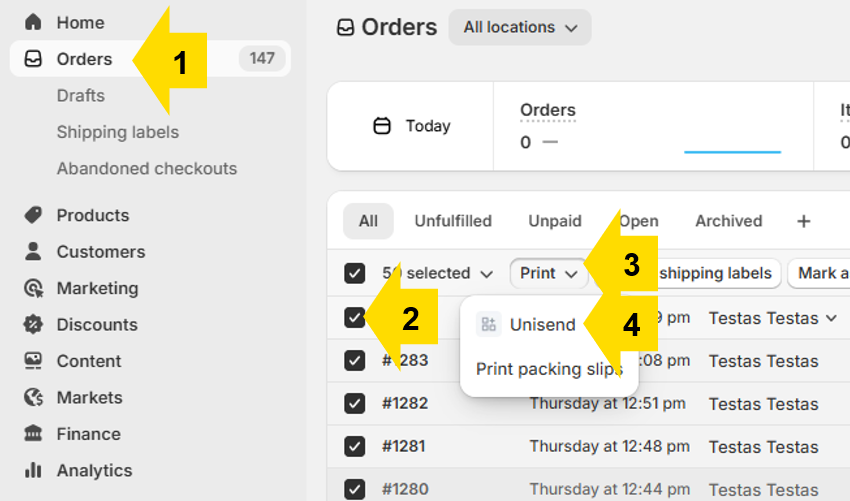
To view the orders you have received, click on the "Orders" (1) button located in the navigation bar.
With the filters at the top of the table, you can see only the orders relevant to you, sorting them by order number, date range, status, shipping type and COD (Cash on delivery) service parameters. To clear a filter, press the eraser icon to the right of the filter.
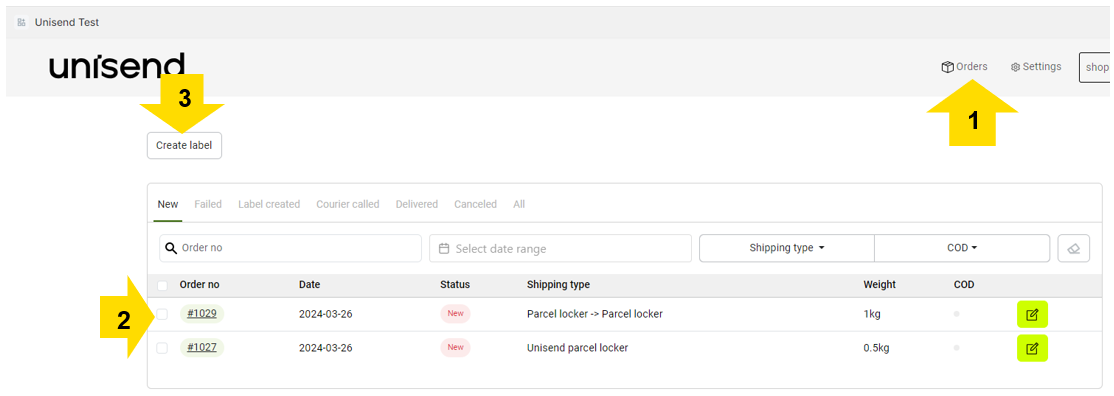
When a new order is received, it is placed under the "New" status card.
To adjust or view the order in more detail, you can click on the button located to the right of the orders table.
To create labels, you need to select (2) the orders you wish to include and then click on the "Create label" (3) button located at the top left.
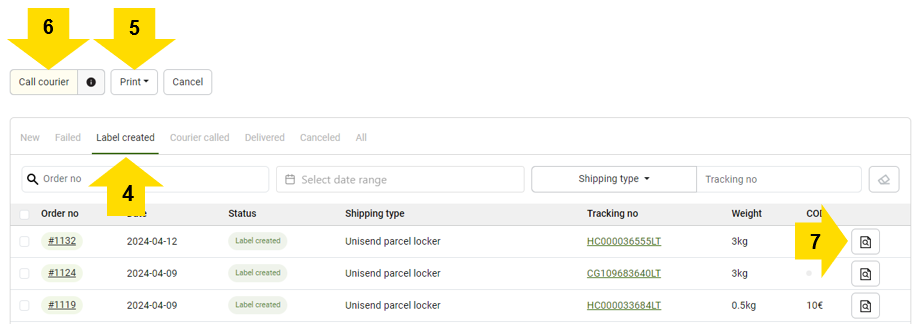
After the shipment is created, the order moves to the table card labeled "Label created" (4), where you can print (5) documents, labels, or declarations, call the courier (6) (automatic courier call is activated by default, so the courier is called automatically), and cancel the shipment if necessary. To view detailed shipment information, press the button (7) to the right of the respective row.
Quick printing
With Unisend, you can generate shipping labels directly from the default Shopify Orders page. Simply go to Orders, select the orders you want to ship, and choose Print → Unisend — all without leaving the page. This allows for fast label printing, flexible order filtering using Shopify’s built-in tools, and easy bulk label generation.
Manifest printing
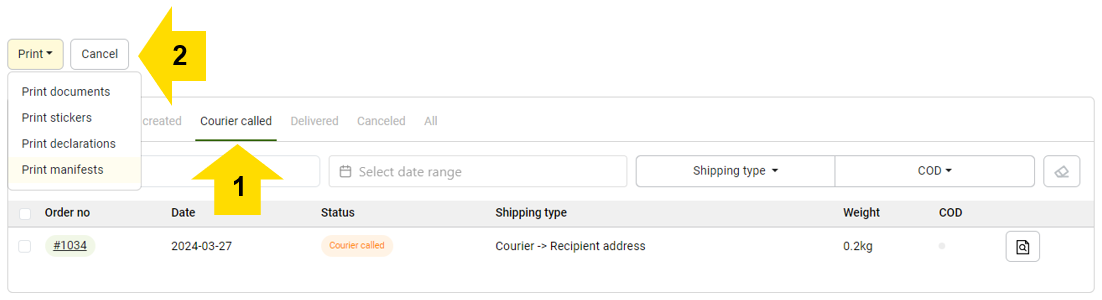
After calling the courier, the order moves to the table card labeled "Courier called," (1) where you can print a document, label, declaration, or manifest for the courier by clicking the "Print" button (2) or cancel the shipment by clicking the "Cancel" button. After canceling the shipment, the order migrates to the "Canceled" table card.
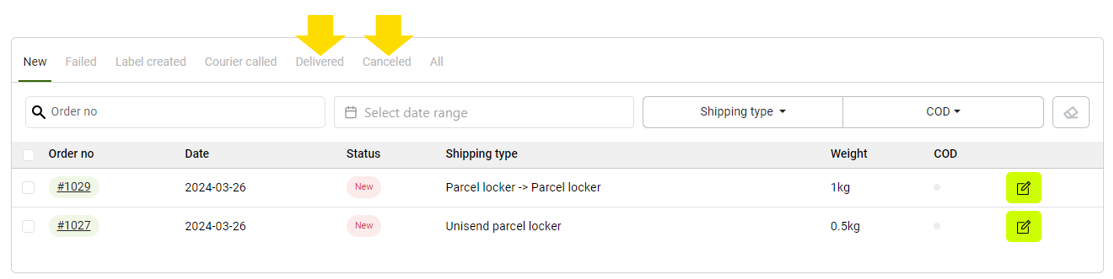
After you click “Print Label,” those shipments are moved to the Processed section. This way, you can easily track which labels are ready and which have already been printed. Once your shipment has been delivered, you will see the order on the "Delivered" table card.
Single shipment adjustment
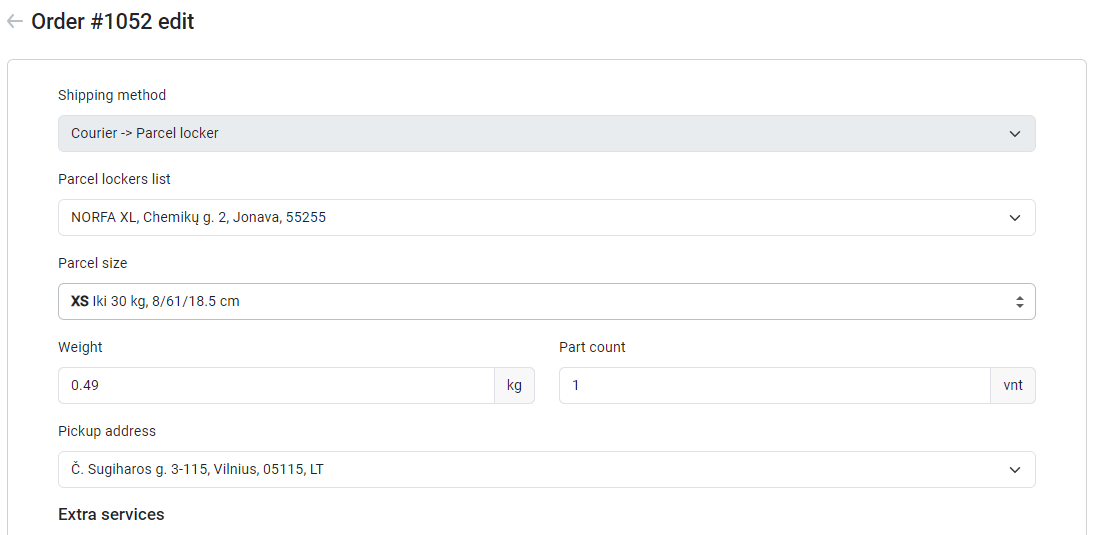
To adjust the shipment, press the button on the right of the row of the table (1).
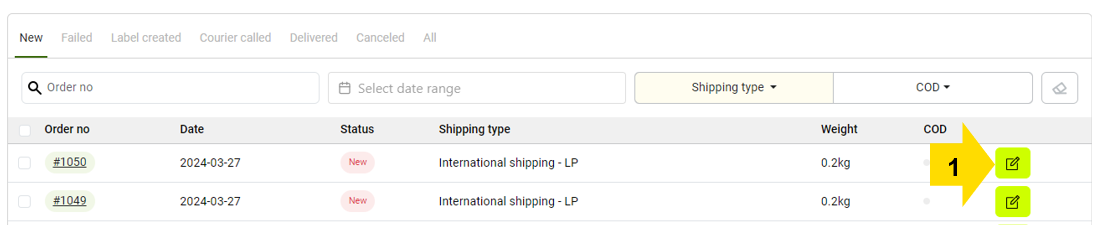
After opening the shipment adjustment section, you can:
- Change the shipment parcel locker, size, weight, part count, and pick-up address, if necessary.
- Add extra services such as COD, POD, and other available services.
- Fill out the CN declaration for international shipments.
Shipment Content & Customs Declarations
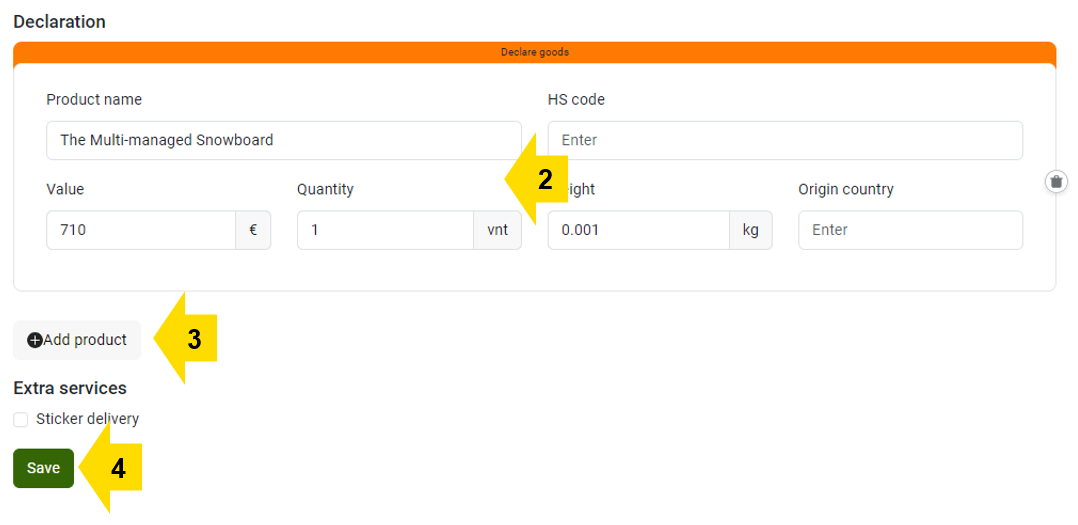
Depending on the destination of your shipment, you must provide specific content details to comply with current regulations:
- Shipping within the EU: A simplified Parcel Content declaration is required for all shipments to ensure smooth processing through automated sorting centers.
- Shipping to Non-EU Countries: A full Customs Declaration (CN22/23) is mandatory. This requires more detailed information, including HS Codes and the Country of Origin, which are necessary for customs clearance.
To fill out the declaration, click on the order adjustment button (1) and complete the opened form (2).
The required declaration data is automatically generated from your Shopify order details, so manual entry is only necessary if you wish to review or modify the information (as shown in image). Once you save the adjustments and generate the shipping label, all mandatory declaration documents are automatically integrated into the label itself.
Fulfillment and tracking
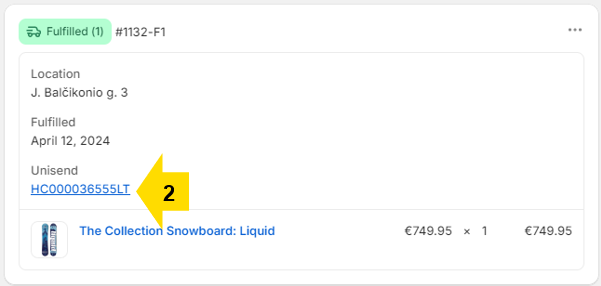
The fulfillment status is automatically assigned to the order once the courier is called. Additionally, after the courier is called, an email containing tracking number is sent to the customer, and the shipment's tracking number is inserted into the order window.
You can track the shipment status by clicking on the tracking number in the app's order list.

Alternatively, you can access the required order from Shopify's default order list. A link to the tracking page will be appended to the order.
Troubleshooting
Feel free to reach out to us via email at api-manosiuntos@post.lt, integrations@unisend.lv, or integrations@unisend.ee if you encounter any issues or have questions related to the integration or functionality of this app.